Everyday we use the internet for regular activities – many of us take to the internet to find that piece of information we require, or to find the service or product we need but for some users the Web can be a place with multiple roadblocks.
The Accessibility for Ontarians with Disabilities Act (AODA) is a law created in 2005 by the government of Ontario, Canada to help improve accessibility standards across the province. As part of this law Web Accessibility standards were put into place. The goal of AODA is for the province of Ontario to be accessible to people with disabilities by 2025.
But that doesn’t mean you need to design a whole new website to make it accessible friendly. In this article, we have provided useful tips to test your website, and improve your experience with all of your users.
Making your website accessible is a multi-step approach and can’t be completed instantly, it takes careful review and a full audit. The WCAG 2.0 is an internationally accepted standard for web accessibility developed by the World Wide Web Consortium (W3C), an international team of experts. The WCAG outlines several steps you need to take to meet certain guidelines, each guideline has three levels of accessibility: A, AA and AAA.
As an organization you will need to determine the resources and requirements you have available and which level you need to achieve – you can learn more about the varying levels here – https://www.ontario.ca/page/how-make-websites-accessible
This tutorial will assume you have the following:
- A WordPress Website with Admin Access
- The ability and knowledge of how to install a plugin (How to install a WordPress Plugin)
Testing your Website:
Several tools exist online to help test your existing website. Google Lighthouse is a tool that has a large collection of data, allows you to create a PDF report and is available for free – it does require you to have google chrome setup. You can find instructions on how to run it here – https://developers.google.com/web/tools/lighthouse#devtools
You can also use achecker (https://achecker.ca/checker/index.php) which is a recommended tool by the Government of Ontario.
Alt Tag / Alt Text for Images
Alt tags are hidden text attached with your image. Alt tags can have several purposes but for accessibility they can provide useful information for users who face visual impairment and are using screen readers. Alt tags have have the extra benefit of being great for SEO.
How to retrofit and adjust:
Any image that is displayed on your website should have descriptive alt-text. This alt-tag should describe to a user what your image is about, and the context of the image – why was the image placed there, and does everything make sense without seeing the image?
If the image includes text, the alt tag should include the text. When creating alt-tags you should avoid stuffing the images with keywords and focus on accurate content. For images that are decorative only and serve no purpose for the user, you can leave the alt text blank.
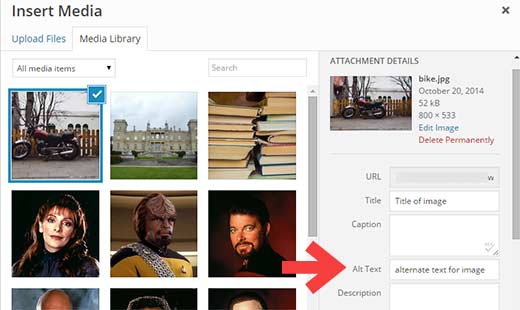
You can add the alt-tag to images by using the WordPress Media Library, select on the image and adding the alt-tag. If you have a website with several images, you can use a handy plugin like Media Library Helper by Codexin to help bulk edit images.
When uploading images in the future, you can set the alt-tag when uploading the images through your page or media library. Creating the alt-tag while uploading the image will ensure your website continues to be accessible friendly.
Accessibility Plugins
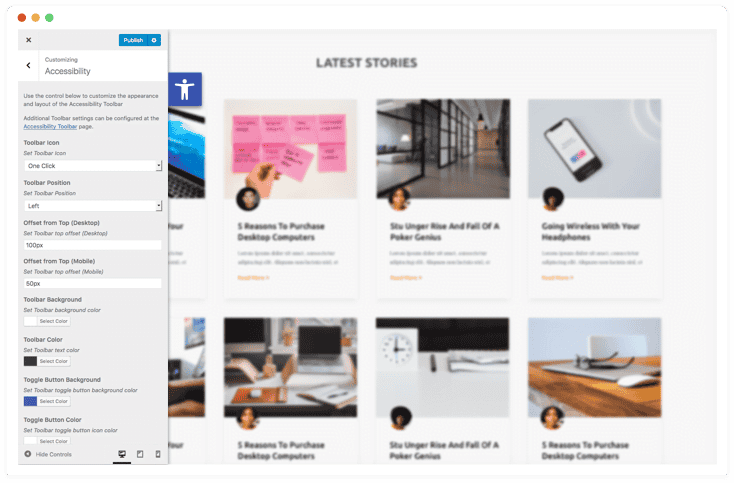
Using plugins to help meet accessibility requirements is another way to retrofit your website. One Click Accessibility is a plugin available through WordPress that you can install and instantly add useful features as a toolbar to your website. While most accessibility issues can’t be addressed without directly changing your content, One Click Accessibility adds a number of helpful accessibility features with the minimum amount of setup and without the need for expert knowledge.
These features include:
- Resize font (increase/decrease)
- Grayscale
- Negative Contrast
- High Contrast
- Light Background
- Links Underline
- Readable Font
- Link to Sitemap / Feedback / Help pages
Accessibility Features:
- Enable skip to content
- Add outline focus for focusable elements
- Remove the target attribute from links
- Add landmark roles to all links
- Customizer for style adjustment
Descriptive Links
Take a look through your website and ensure all your links are descriptive – avoid having links that say “Click Here” or “Learn More”. Your links should tell the user exactly what they can expect when the link action is taken.
Our homepage has examples of this for each service. For Search Engine Optimization instead of “Learn More” we put a link in a button that says “Learn More About SEO”. Additionally having links underlined is an additional bonus and will help your link stand out.
Accessibility Statements
An accessibility statement is a page or section on your website that describes the actions your business or website has taken to meet accessibility standards and how a user can contact you with any concerns.
In your accessibility statement you should include
- What level of WCAG your website is aiming to achieve
- When your website was updated to meet those standards
- How a user can contact you if they find content that isn’t meeting that standard
- What you will do with that information
A great example of this is the whitehouse.gov website and their accessibility policy – https://www.whitehouse.gov/accessibility/
You can also include an e-mail, or contact form instead of a phone number.
Moving Forward
Creating an accessible website is not only recommended, it’s a requirement for some organizations in Ontario. As always, you should hire a specialist to ensure your website meets the WCAG 2.0 Guidelines and create a policy for your on-going content, branding and any images you add to your website in the future.